部署自动化构建环境
安装Jenkins
安装方法
bash
$ dnf search jenkins
Last metadata expiration check: 0:29:36 ago on Mon 20 Nov 2023 08:58:40 AM CST.
=================================== Name & Summary Matched: jenkins ===================================
python3-jenkins.noarch : Python bindings for the remote Jenkins API因为 Jenkins 本身是没有在 dnf 的软件仓库包中的,所以我们需要连接 Jenkins 仓库:
- wget 是 Linux 中下载文件的一个工具,-O 表示输出到某个文件夹并且命名为什么文件
- 命令如有变动直接参考官网说明即可:https://pkg.origin.jenkins.io/redhat-stable/
bash
$ wget –O /etc/yum.repos.d/jenkins.repo http://pkg.jenkins-ci.org/redhat-stable/jenkins.repo
$ mv jenkins.repo /etc/yum.repos.d/根据对应 repo 就可以使用 dnf 进行安装了,但是安装是有认证的,需要使用 rpm 导入 GPG 密钥以确保软件合法
bash
$ rpm --import https://pkg.jenkins.io/redhat/jenkins.io.key
# 或者
$ rpm --import http://pkg.jenkins-ci.org/redhat/jenkins-ci.org.key之后编辑一下 jenkins.repo
bash
$ vim /etc/yum.repos.d/jenkins.repo将 http://pkg.jenkins.io/redhat-stable 的 -stable 删除掉
bash
[jenkins]
name=Jenkins-stable
baseurl=http://pkg.jenkins.io/redhat
gpgcheck=1安装 Jenkins
bash
$ dnf install jenkins --nogpgcheck启动 Jenkins 服务
bash
$ systemctl start jenkins
$ systemctl stop jenkins
$ systemctl status jenkins
$ systemctl enable jenkins检查是否启动成功

修改启动配置
修改 Jenkins 端口
- 我环境变量默认使用的 jdk1.8,我安装的 jenkins 是新版需要配置 jdk11-17
- 默认端口为 8080,我要改为 8081
bash
$ vim /usr/lib/systemd/system/jenkins.service
# The Java home directory. When left empty, JENKINS_JAVA_CMD and PATH are consulted.
Environment="JAVA_HOME=/home/software/jdk-17.0.9"
# Port to listen on for HTTP requests. Set to -1 to disable.
Environment="JENKINS_PORT=8081"
重新加载配置文件,之后重启 jenkins
bash
# 重新加载 service 配置文件
$ systemctl daemon-reload
# 重启 jenkins
$ systemctl restart jenkins直接访问 Jenkins 是无法展示页面的,需要将其加入到安全组中

打开浏览器,输入 IP + 对应端口,之后需要解锁 Jenkins
- 获取输入管理员密码
bash
$ cat /var/lib/jenkins/secrets/initialAdminPassword
fc53e288a4ac429baa33b44b412dd7a1安装插件
安装推荐插件即可

额外插件安装:
- 上面默认安装的插件就不再提及用途了
| 插件名称 | 插件用途 |
|---|---|
| Maven Integration plugin | Maven |
| Zentimestamp plugin | 时间戳变量 |
| Build Name and Description Setter | 自定义构建任务名称 |
| Persistent Parameter Plugin | 持久化构建参数 |
| Role-based Authorization Strategy | 用户权限管理插件 |
| Deploy to container Plugin | 远程部署插件 |
| Generic Webhook Trigger Plugin | 特定提交触发自动构建 |
| Publish Over SSH | 远程控制主机执行脚本 |
| Job Configuration History Plugin | 记录job的历史更新记录 |
| Console Column Plugin | 视图中展示上一个控制台 |
| Rebuilder | 按照上次构建所选的参数进行构建 |
| Git Parameter | 可添加Git的branch或者tag来作为参数进行构建 |
| Build Trigger Badge | 项目视图首页展示项目构建人 |
| Version Number | 提供更加丰富的构建版本号 |
| Figlet Buildstep | 在构建过程中输出一个简单的横幅 |
| Extended Choice Parameter | 回滚使用的这个插件 |
| Docker Pipeline | pipeline中docker环境隔离的能力 |
| Parameterized Remote Trigger Plugin | 远程触发另一个jenkins项目构建配置 |
| Blue Ocean | 持续交付(CD)Pipeline过程的可视化 |
| Simple Theme | 主题 |
| DingTalk | 构建通知 |
安装Nginx
安装方法
安装 Nginx,或者去官网直接下载
bash
$ dnf install nginx启动 Nginx
bash
$ systemctl start nginx
$ systemctl stop nginx
$ systemctl restart nginx
$ systemctl status nginx
$ systemctl enable nginx检查是否启动成功

修改配置
修改配置文件
bash
$ vim /etc/nginx/nginx.conf增加压缩配置
nginx
http {
  gzip on;
  gzip_min_length 1k;
  gzip_comp_level 5;
  gzip_types text/plain text/css text/javascript application/json application/javascript application/x-javascript application/xml;
  gzip_disable "MSIE [1-6]\.";
  gzip_vary on;
}替换 /usr/share/nginx/html 里的 index.html
bash
$ cd /usr/share/nginx/html问题:80端口占用
bash
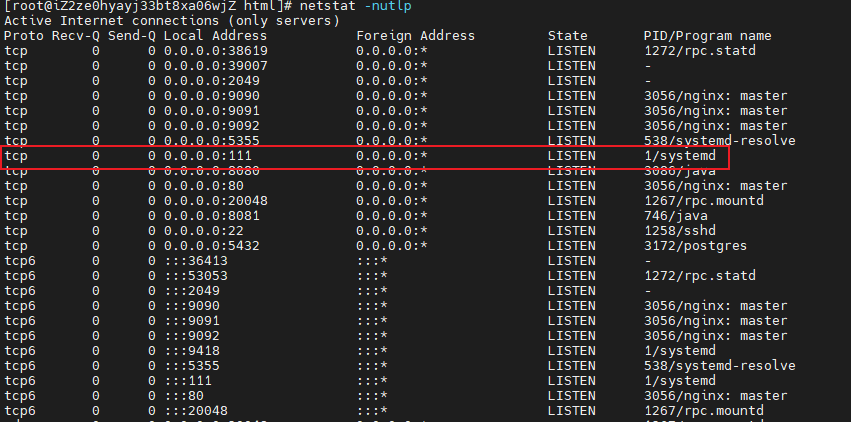
$ netstat -nutlp | grep 80
tcp6       0      0 :::80                   :::*                    LISTEN      1/systemd

# 或者使用 lsof 查看端口
$ yum install lsof
lsof -i:80
解决方法:
- 大概率是 httpd 的锅,关闭并禁用即可
bash
# 停止进程
$ systemctl stop httpd
$ systemctl stop httpd.socket
# 禁止随开机启动
$ systemctl disable httpd
$ systemctl disable httpd.socket如果不使用 ipv6,直接在系统启动时禁用即可,这样也可以提高系统访问的速度
bash
$ vim /etc/sysctl.conf
net.ipv6.conf.all.disable_ipv6=1
net.ipv6.conf.defalult.disable=1
$ reboot111 端口的进程是 systemd,实际上用的是 rpcbind,大部分服务是不依赖于rpcbind的,只有NFS需要用到这个服务,所以可以禁掉
- systemd-resolve 系统服务解析主机名、IP 地址、域名、DNS 资源记录、服务

bash
$ systemctl stop rpcbind.socket
$ systemctl stop rpcbind
$ systemctl disable rpcbind.socket
$ systemctl disable rpcbind问题:与systemd竞争

bash
# 创建目录
$ mkdir /etc/systemd/system/nginx.service.d
# 增加配置文件
$ printf "[Service]\nExecStartPost=/bin/sleep 0.1\n" > /etc/systemd/system/nginx.service.d/override.conf
$ systemctl daemon-reload
$ systemctl restart nginx安装Tomcat
去官网下载或者使用 wget 下载到指定目录
解压 tomcat 包
bash
$ tar -zxvf apache-tomcat-9.0.55.tar.gz
$ pwd
/home/software/apache-tomcat-9.0.55配置环境变量
bash
$ vim /etc/profile
export TOMCAT_HOME=/home/software/apache-tomcat-9.0.55
export PATH=$TOMCAT_HOME/bin:$PATH重新加载环境变量
bash
$ source /etc/profile启动和关闭
bash
$ startup.sh
$ shutdown.sh检查是否启动成功

安装Nexus
内网私库可以使用 nexus 进行搭建,如下使用的是 v3 版本
解压 nexus 包
bash
$ tar -zxvf nexus-3.62.0-01.tar.gz修运行 nexus 默认访问端口:
bash
$ vim /home/software/nexus-3.62.0-01/etc/nexus-default.properties
application-port=8082注册服务
bash
$ ln -s /home/software/nexus-3.62.0-01/bin/nexus /etc/init.d/nexus
# 暂时先不设置开机自启了
$ /etc/init.d/nexus start